YOGA- ASANAS & MUDRAS
Yoga is one of the most precious
heritages of India. It is a popular perception that yoga a set physical postures
and breathing exercises. However, it is much more than that. It is an art of
healthy living and a science of experience that can be practiced by people of
all ages. Yoga enhances human capabilities at physical, mental and spiritual
levels. Spreading the awareness of the Yoga- benefits is necessary to initiate
more and more people, especially the youths, into world of good health and happiness
through Yoga.
Yoga has its roots in the ancient texts like the Vedas and the Upanishads.
Technically speaking nd light.become
something of a fad and has spawned exercise regimes like power yoga and hot
yoga. It’s also a popular form of alternative therapy to treat various
ailments. Yogis claim that treatments have benefited patients of autism, asthma
and even cancer as they make the body more receptive to cure and healing. On
The Health Site, you’ll find everything you ever needed to know about yoga
including the various yoga asanas, the various health benefits, asanas for a
better sex life and how it helps battle ailments like diabetes, stress and
depression, arthritis, belly fat and even menstrual pain.
One should perform all the movements in all the Asanas in comfortably and in
controlled mnner with uniform speed, voiding jerky and hasty movements,
breathing normally all through the Asanas. Dress should minimum, loose21st June is celebrated as the World yoga Day. On this day ( 21st June,2014) this year I have completed the following Yoga Asanas/ Mudras(putting both together) at my Yoga Institute, where these asanas/ mudras were assigned to me after a complete medical check up and after considering my age and physical condition of my body:
I. SVASTIKASANA [स्वस्तिकासन ]

Steps to do this pose:


Sit down on the yoga mat.Stretch out both legs together, hands by the side of the body, palms resting on the ground, fingers together pointing forward.Now fold your one leg at the knees and put it against the joint of the other thigh.Fold the other leg and put it near the joint of the other thigh.
(मांडी घालून, एका पायावर दुसरा पाय घेऊन बसणे) Put both hands on the knees in jnana mudra.
Retain
this position for 5 to 10 minutes or as comfortable to you. Concentrate
and focus on each part of your body. Free your mind of external
thoughts. Relax completely, feel the sensations that you get but do not
respond to them. While returning to the original position first stretch
out right leg. Then stretch out left leg and keep both legs together.
Benefits
It
helps maintain normal temperature within the body and tones abdominal
muscles and sciatic nerve. It improves one's concentrating power. This
is a very suitable position for knowledge, learning, meditation,
preparation for other asanas and relaxation between any two sitting
position. As
the backbone is kept erect in this asana, its functioning is greatly
improved. Dnyana Mudra further helps in stabilizing pulse beats.
Consequently strain on muscles is reduced, which in turn reduces strain
on heart. Also breathing slows down, collective effect of all this is one can achieve concentration of mind.
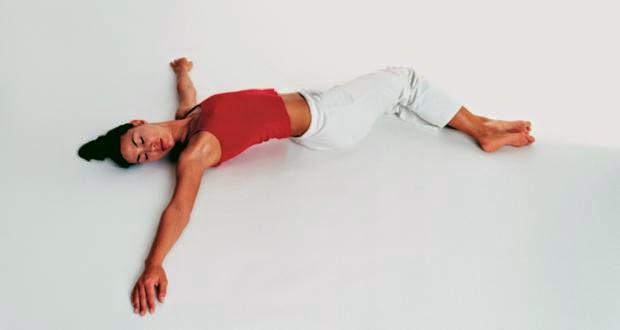
II. SHAVASANA [शवासन]


The name comes from the Sanskrit words Shava (शव, Śava) meaning "corpse",[3] and Asana (आसन, Āsana) meaning "posture" or "seat".
Steps to do this pose:
Shavasana
is perhaps the most important part of yoga practice. Lying on the back,
the arms and legs are spread at about 45 degrees, the eyes are closed
and the breath deep, usingdeergha (long) pranayama.
The whole body is relaxed onto the floor with an awareness of the chest
and abdomen rising and falling with each breath. All parts of the body
are scanned for muscular tension of any kind, which is consciously
released as it is found, optionally with a small repetitive movement of
the area. All control of the breath, the mind, and the body is then
released for the duration of the asana, typically 20–30 minutes although
currently I am doing just 5 minutes of it.The asana is released by
slowly deepening the breath, flexing the fingers and toes, reaching the
arms above the head, stretching the whole body, exhaling, bringing the
knees to the chest and rolling over to the side in a fetal position.
After a short time and a slow inhalation, the practitioner takes a
seated position.
Benefits
It is intended to rejuvenate body, mind, and spirit.
Relaxation
After
the exertions of the practice, shavasana allows the body a chance to
regroup and reset itself. After a balanced practice, the entire body
will have been stretched, contracted, twisted and inverted. This means
that even the deepest muscles will have the opportunity to let go and
shed their regular habits, if only for a few minutes.
Furthermore, the physiological benefits of deep relaxation are numerous and include:[1]
- a decrease in heart rate and the rate of respiration,
- a decrease in blood pressure,
- a decrease in muscle tension,
- a decrease in metabolic rate and the consumption of oxygen,
- a reduction in general anxiety,
- a reduction in the number and frequency of anxiety attacks,
- an increase in energy levels and in general productivity,
- an improvement in concentration and in memory,
- an increase in focus,
- a decrease in fatigue, coupled with deeper and sounder sleep, and
- improved self-confidence.
A] With one leg at a time

B] With both the legs at a time

Steps to do this pose:
Lie on your back on the yoga mat, hands at the side touching your body and palms facing the floor (ground) and heels together and the ankles touching each other. Now raise your right leg as high as you (comfortably) can,without bending at the knee. With practice you can raise it vertically straight making a right angle with the ground. Maintain the position for some time, breathing in 5 to 10 times deeply and slowly, keeping the rest of the body relaxed. Lower the right leg slowly and come back to the original position. Repeat the procedure with your left leg to complete one round of the Asana.
Do 3 such rounds and your ready for the next Asana.
IVA . ARDHA PAVANMUKTASANA [अर्ध पवनमुक्तासन]
Without raising the head and first with one leg at a time and then
with both the legs at a time.


Steps to do this pose:
Lie on your back, with legs stretched, heels
together and ankles touching each other. Slowly bend your right knee and with
kelp of your hands pull and press the right knee to your stomach. Maintain the
position for some time breathing in 5 to 10 times deeply and slowly, keeping
rest of the body relaxed. Slowly lower the right leg and come back to the
original starting position. Repeat the same procedure for the other leg to
complete one round of this Asana.
Do such 3 rounds.
Repeat the same procedure by raising both the legs
together at a time.
Do such 3 rounds.
B] PURNA PAVANMUKTASAN [पूर्ण पवनमुक्तासन ]
Raising the head and first with one leg at a time and then with both
the legs at a time.


Steps to do this pose:
Lie on your back, with legs stretched, heels
together and ankles touching each other. Slowly bend your right knee and with
kelp of your hands pull and press the right knee to your stomach and
simultaneously lifting your head as high as possible. With practice you will be
able to your head to the knee. Maintain
the position for some time breathing in 5 to 10 times deeply and slowly,
keeping rest of the body relaxed. Slowly lower the right leg and come back to the
original starting position. Repeat the same procedure for the other leg to
complete one round of this Asana.
Do such 3 rounds.
Repeat the same procedure by raising both the legs
together at a time.
Do such 3 rounds.
V. MAKARASANA [मकरासन ]


Steps to do this pose:
Lie prostrate (उताणे पडा) with legs spread
apart at 45 degree angle with each other. Let your face rest on your folded
arms. Maintain the position for three minutes, keeping the body relaxed and
breathing normally, deeply and slowly.
VI. BHUJANGASANA [भुजंगासन]


Steps to do this pose:
Lie on you back with face downwards,
legs stretched with knees / ankles touching each other and hands at the sides.
Now bend the arms at the elbows and bring the palms in line with your shoulders
and place them close to you body and facing the ground. Raise your chest, neck
and the head so that you are able to see straight in front of you. Maintain
the position for some time breathing in 5 to 10 times deeply and slowly,
keeping rest of the body relaxed.
VII. ARDHA SHALABHASANA [अर्ध शलभासन]

Steps to do this pose:
Lie prostrate on the yoga mat with your chin
supporting your face. Let the hands be close to your body. Roll the palms into
fists. Now slowly raise your right leg straight up as high as you are able to
and without bending at the knee. Maintain the position for some time breathing in 5
to 10 times deeply and slowly, keeping rest of the body relaxed. Repeat the
procedure with respect to the other leg so as to complete one round of this
Asana.
Do such 2 to 3 rounds.
VIIIA. KATIVAKRASANA [ कटीवक्रासन]
Steps to do this pose:
Lie
on your back, legs stretched and the hands are kept sideways such that they make
right angle with your body (i.e. your body and the arms make a cross or a plus
+ sign). Let palm rest facing the ground. Bend both the knees and bring the
heels close to your buttocks. Ankles touch each other and the soles of your
feet firmly on the ground. Now turn both the legs (bent at the knees) towards
your left so that the left side ( buttocks, thigh, knee side calf and the ankle
touch the ground and the right leg (bent) is above it. Simultaneously, turn
face to the other side (i.e. right) and you are able to look over and in line
with your shoulder. Maintain the
position for some time breathing in 5 to 10 times deeply and slowly, keeping
rest of the body relaxed. Slowly come back to the original starting position. Repeat
the same procedure on the other side to complete one round of this Asana.
Do such 3 rounds.
VIIIB. VAKRASANA [वक्रासन]


Steps to do this pose:
Sit erect, legs stretched, heels together so that spine is at right angle with the ground. Keep the palms on the respective knees. Now bend the right knee and place the right foot by the side of the left knee. Stretch and twist your waist towards your right side and take the left hand around your right knee. Roll your right shoulder back and place your right palm 9(facing the floor) in line with the left leg but away from the body so as to keep the spine erect yet twisted. Look at the wall behind. Keep the face relaxed with natural breathing. It is recommended to maintain this position for half a minute to three minutes. to come back to the original position, bring back your hands one by one to their original place, stretch your right knee and come back to the original starting position. Repeat with the left leg.
Benefits:
Cures constipation,flatulence, dyspepsia and Liver weakness. It also controls and cure diabetes as it activates the Pancreas and reduces the extra fats around the abdominal region.
IX BHADRASAN (BUTTERFLY) [भद्रासन]

Steps to do this pose:
1.
Sit in an upright position and assume Swastikasana.
2. Stretch out both legs in front of you close together.
3. Bend your legs at the knee and bring the feet towards the body. The knees should be pointed outwards.
4. Join the soles of the two legs with the toes and heels close together.
5. Using the thumb, forefinger and middle finger clasp the toes and fore part of both feet together.
6. Maintain an erect posture.
7. Bring the feet closer to your body while bending the elbows outward.
8. Widen your thighs and gently bend the knees downwards.
9. Keep drawing the feet inwards until they are well placed close to the perineum.
10. Place the heels on either sides of the perineum.
11. Sit straight up.
12. Remain in this position for 10-15 seconds, breathing normally.
13. Flap the thighs as if they are wings of a butter fly.
14. Release the finger lock.
15. Slowly stretch out the legs in front and return to starting posture.
Benefits
- · The pose can relieve stiffness of knees, hips and ankle-joints
- · Bhadrasana should be practiced for healthy kidneys, prostrate, and urinary bladder.
- · Tension is released from the spinal coccygeal and sacral regions.
- · Practicing of this posture helps in blood supply to the muscles and ligaments of the uro-genital region.
- · The pelvis and groin muscles are strengthened.
- · Inner thighs get toned up.
X.GOMUKHASANA [गोमुखासन]


Steps to do this pose:
Sit straight and erect. Fold your left leg by
bending it at the knee. Take your right leg around it (bending at the knee) and
try to place the sole of the right foot on the ground. Raise your right arm
above the head and bend it at the elbow behind your back. Simultaneously, take
the left arm behind. Then let the right palm reach the left palm and try
pulling the palms, the right pulling the left one up and the left pulling the
right one down. Initially, you may use a towel (gripping it firmly between the
palms), which I am currently using, minimize the distance between the palms and
with right one pull towel up while pulling it down with the other. Maintain the
position for some time breathing in 5 to 10 times deeply and slowly, keeping
rest of the body relaxed. Slowly come back to the original starting position.
Repeat the same procedure by reversing the positions of the legs to complete
one round of this Asana.
Do such 3 rounds.
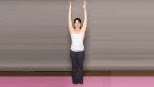
XI. PARVATASAN [पर्वतासन]

Steps to do this pose:
1. Sit in Swastikasan posture and keep your spine and neck
straight.
2. Join the palms in namaskar mudra (palms facing each other
with fingers pointing upwards) at the
chest level and closing the eyes gently, raise the namaskar to the top of your head.
3. Raise both the hands above the head, maintaining the namaskar, thus giving the impression of a mountain or Parvat.
4. Elbows should be straight and hands stretched upwards. Breathing should be slow and deep. Feel the beat of the heart.
5. Return to normal position while exhaling. This asana can be performed three to four times.
Benefits & Precautions:
Parvatasana pulls up all the abdominal, pelvic and side muscles, stretches the spine and ribs. It gives natural massage to the heart and lung muscle and is very useful in relieving the lumber, spinal, shoulder, knee and ankle pains and varicose veins.
XII. BRAHMAMUDRA [ब्रह्ममुद्रा]


Sit in Swastikasana, resting the
back of the palms respective knees. With the index fingers of each arm and the
thumbs of the respective hands make loops and let the other remaining three fingers
of each hand remain stretched and pointing downwards. Keeping the chest and the
shoulders straight and erect turn your neck to your right, so that you can see
over straight and in line with your shoulder and over it. Maintain the position
for some time, breathing normally all the while. Slowly turn your neck and bring
your face in front, maintain the posture for some time. Following the same
procedure turn your neck towards your left, again in front then upwards, back
in front, then downwards and finally in front once again, maintaining the
positions for some times for each posture to complete one round of this Asana.
Do such 2 to 3 rounds.
XIII.VAJRASANA [वज्रासन]


Steps to do this pose:
Bend your knees backwards and sit
so that your buttocks rest on the heels of your feet. Big toe of left foot should touch the big toe the
right one and both the heels should
remain outward. Keep the palms on the respective thighs. Maintain the posture
for 3 to 5 minutes, breathing normally.
XIV. CHAKRASANA [चक्रासन]

Steps to do this pose:
Stand straight and erect, heels
together and the hands at the sides. Raise the right arm sideways (without
bending it at the elbow) and horizontally with the palms facing the ground till
the arm is parallel to the ground. Now turn the palm so that now the back of
the palm faces the ground. Raise the arm further up so that the upper arm
touches your head. Stretch the arm over the head towards the left such that
your neck and the head turn towards the left side making ‘crescent moon’ shape
with the right arm (with palm facing down),the head, the neck and the torso. Maintain the position for some time breathing
in 5 to 10 times deeply and slowly, keeping rest of the body relaxed. Slowly
come back to the original starting position. Repeat the same procedure using
the other arm to complete one round of this Asana.
Do such 3 rounds.
XV. TADASANA [ताडासन]
Steps to do this pose:
Stand straight, erect with hands at the sides and in attention
posture. Slowly raise both the arms parallel to each other and in front of you,
fingers stretched. Raise them further up
and above your head so each arm is touching your head on the sides. Take a deep
breath and stretch your arms high up, standing on your toes, stretching your
calf muscles, knees, thighs. waist, ribs, shoulders and arms, so as reach
maximum height. Maintain the position for some time breathing in 5 to 10 times
deeply and slowly and take a deep breath and come back to the original position
by breathing out. Return to normal
position while exhaling.
Do such 3 rounds.
XVI. TRIKONASANA [त्रिकोणासन]

Steps to do this pose:
Stand straight and erect, heels/
feet apart and the hands at the sides.
Raise both the arms sideways (without bending it at the elbow) and horizontally
with the palms facing the ground till the arms are parallel to the ground.
Twist your waist and turn to your left keeping the spine erect. Slowly bend
down and stretch your right arm so as touch the lower part of your left leg
with your right palm, without bending your knees. Simultaneously, the left arm goes
up and is inclined in North- West direction with palm facing your bent head and
fingers pointing in N-W direction. Looking at the palm of your left hand maintain
the position for some time breathing in
5 to 10 times deeply and slowly, keeping rest of the body relaxed. Slowly come
back to the original starting position. Repeat the same procedure using the
other arm to complete one round of this Asana.
Do such 3 rounds.
XVII. DRISHTI- NASAGRA [दृष्टी नासाग्र]

Steps to do this pose:
Sit in Brahmamudra
posture. Roll the right palm into a fist keeping the thumb stretched and
out. Raise the right arm without bending at the elbow in front of you
such that the tip of the outstretched thumb (pointing vertically
upwards) is exactly in line with your eyes. Slowly rotate the arm
horizontally and keep looking at the tip of the thumb till the right arm
is in line with your shoulder and continue looking at it as the arm is
rotated back in front. Repeat the same with the other arm to complete
one round of this Asana. Dothis exercise for 5 to 10 minutes.
XVIII. LOMA- VILOMA[ लोम - विलोम]


Steps to do this pose:
Sit in Brahma Mudra posture.
As shown in the picture above, keep the little finger, ring finger and
the thumb of your right palm stretched and open while the remaining two
fingers closed. Raise the right arm, bend it at the elbow and close the
right nostril with the help of the thumb and inhale deeply through the
left nostril, release the thumb pressure and close the left nostril with
the help of ring finger and the exhale through right nostril. Then
breathe in through the right nostril and breathe out the left one to
complete one round. Do 20 such rounds.
XIX. UJJAYI [उज्जायी]

\
Steps to do this pose:
- Lie down on the floor, with your legs outstretched and arms by your side.
- Now, relax your entire body and breathe out through your mouth. While breathing out, make sure your lungs are emptied and you purse your lips into a pout (like you would if you were to whistle).
- Once your lungs are emptied, inhale air through your nose. Make sure you fill in your lungs completely. Hold your breath and stretch out your legs (by pointing your toes towards the wall in front of you).
- Hold this position for as long as you can hold your breath, then breathe out as you relax your body.
Steps to do this pose:
Sit on the Yoga mat
cross-legged with straight and erect back at all times, in Brahmamudra
posture.Wear loose comfortable cotton clothes so that all the channels
of the body are free and comfortable.Slowly inhale and exhale for some
time.Now place your right palm (facing up) in your left palm, kept
adjacent to your navel.Close your eyes and relax your mind and body.
Slowly realize the vibrations taking place in each part of your body. As
the awareness of the vibrations become more aligned, slowly take a
breath, hold it for a second or two and the exhale slowly. Slowly utter
'OM' (ॐ), breaking into shorter ' O--O' ओ--ओ ') while inhaling and the longer or extended 'MMMM' ('म----म-----म----म---म') while exhaling. Feel the vibrations on your lips, tongue, throat and the chest.
After you have exhaled fully, relax for a second or two. Continue
chanting or reciting 'OM' in this manner for at least 5 minutes or so.
XXI. SHAVASANA [शवासन]
Steps to do this pose: As described earlier.
As I learn more about 'Yoga' in my Institute, I shall up date this blog ,writing more about the benefits and other Asanas and Mudras and about their benefits.
Vinay Trilokekar
As I learn more about 'Yoga' in my Institute, I shall up date this blog ,writing more about the benefits and other Asanas and Mudras and about their benefits.
Vinay Trilokekar